Saturday, June 23, 2012

Taking the Bite Out of the Bark

I get asked all the time how we have the greens rolling 12 -13 on the stimpmeter every single day.  Most of the time I say "If I tell you, then I'll have to kill you, because it's a secret".  Really that isn't true at all.  Anyone that knows me knows my secret is simple...........I cheat!  I just keep the greens regulated with embark.  The photo above shows just how powerful embark is as a plant growth regulator (PGR).  The photo was taken 16 days after embark was applied to the 16th fairway at 2 oz/Acre.  It's not supposed to look like this, obviously my operator, who shall remain nameless, forgot to spray the right side of the fairway.  Now if Doug would have remembered to spray the right half, you really wouldn't notice the difference because the turf on the left doesn't look that bad.  The discoloration of the turf lasts a couple days and then interestingly the color change reverses and the turf sprayed with embark is greener and more beautiful than the turf that was untreated.
Above you can see this phenomenon.  The photo was taken 25 days after the turf was sprayed with embark.  Actually the turf in the bottom of the photo was not treated at all.  This was on the third fairway back in 2009 and this photo was part of my first trial with embark.  The turf the two balls are sitting on was untreated while in the top of the photo, you can see the turf that was treated is actually greener since this is after the discoloration has gone away.  The turf in the top of the photo is definately greener but since it was treated, there is also no seedhead so it looks even more green simply because of the lack of millions of white seedheads.  So this is why we spray embark.  It is the best seedhead suppressor I've ever seen and turf that is treated with embark (or we say turf that has been "barked") stops growing for about 28 days.  
So this photo shows why most people choose NOT to spray embark.  This photo was taken 19 days after the application and the discoloration or bronzing of the turf is at its peak.  On day 23 following the application, the discoloration was gone, the turf was free of seedhead and still not growing.  So while the turf is under the influence of embark, it grows astonishingly slow.  So slow in fact that we do not have to mow greens but maybe every other day.  The greens speeds never really change since the turf is in a state of comatose. The speed in the morning is the same speed as in the evening.  We only mow to really just clean up debris on the greens that has fallen out of the trees.  If we want crazy speeds then we will roll.  Speeds of 13 to 14 are pretty easy if you want them by mowing and rolling.
So why not just keep the greens barked all the time??????  Because turf that is not growing, is also not recovering.  Any areas with high traffic can get worn down to dirt, and the roughs around the greens take a real hit.  This is the "bite" of the embark applications.  The above picture shows overspray of embark into the surrounds of the putting surface.  Notice that  the putting turf looks awesome in this photo.  This photo was taken after three consecutive applications of embark spaced out at 14 day intervals.  After the first application, the negative bronzing effect is no longer an issue but after multiple applications, the roughs can no longer tolerate it.  I took this photo last year and made a commitment to come up with a solution so that this year we can keep the greens barked. I needed to find a way to take the bite out of the bark.  It's pretty easy to see why I want to keep them barked.  They look great, they putt amazing, and we save so much labor by not having to mow them.  Fairway turf regulated by embark is even more amazing considering labor savings.  Mowing fairways once a week is more than adequate when they are barked.  Also, the turf just seems healthier most of the time.  We never see fusarium while under the influence of embark because there is no juvenile growing tissue to be infected.  In fact, ever since I started spraying embark back in 2009, we have had no real disease issues period.
So here is my solution to the bark bite.  I wash the spray off the turf in the roughs.  The picture above was taken just seconds after the green was sprayed.  It's best to get the spray off the roughs as soon as possible. This new technique has worked very well.  So well in fact that I'm thinking of doing this with all applications made to the putting greens.  By eliminating the response from spray to the surrounding roughs, my surround turf looks better than ever, and more natural.  Here is a picture of the first green I took yesterday.  Currently we are 12 days out following the fourth consecutive application of embark.  Our greens have been 12 or more on the stimpmeter every day since we started our first application back in April.  As you can see, the surrounds look great.  Now I'm wondering when to get off the bark..............if ever.
For sure I will have to stop spraying embark at least 30 days before aerification so the greens will recover from that process before winter sets in.  So I'm guessing some of you are thinking I am totally crazy for making all these embark applications, and  the wash off technique seems like an extra step that isn't worth it. Let me just say, if you have pure Poa greens, your the crazy one for NOT trying embark at least once.  BUT do not do it without washing it off the surrounds.  AND make sure you play with it on your nursery first so you know what your getting into.  It is a powerful chemical and one that has totally changed my practices forever.  I don't know what I'd do if I didn't have the luxury of using embark in the spring for seedhead control and unbelievable putting surfaces. It really is like cheating. Here is a short video of me washing it off the surround of the 11th green.  In the background you can hear the sprayrig running as this is done immediately after the spray is applied.  The total time for washing it off this one green is under 3 minutes.  A small price to pay for having the greens barked.


Saturday, June 16, 2012

Bunker Renovation Step by Step


The anticipation is finally over.  The new bunkers are finished and they turned out better than we could have ever expected.  Again, one of those days when I really wished John Harbottle was still with us.  He would have been so fired up seeing the final touches put on these impressive hazards.   Kip Kalbrenner with Ridgetop Inc. did an amazing job throughout the renovation process but today his crew was really impressive.  They installed the bunker sand on all six bunkers in about 4 hours.  The sand was rolled, packed, raked, watered, and then raked again in time for today's shotgun tournament which started at 1.  I hit some shots out of them and they are surprisingly firm for just being a few hours old. They should play just fine this weekend and I expect them to improve each day as they settle out over the next few months.  Now that they are back in play, I thought I would review the entire process of the renovation.
The first step was removing the sod around the area which would be disturbed by construction.  Then the rough shaping was done to create the general shape of the bunker.  We call this "hogging" out the bunker.  Here is a short video of Kip hogging out the bunker on #16.  This is the bunker were we found some of the wood stave pipe which was installed in 1923.
Once the rough shape of the bunker was established, the edge was carved in.  This was the part that really was Kip's creativity in action.  John guided the process but he really allowed Kip to just use his own judgement during this step.  We call this "wacking" the bunker edge.  Here is a video of "wacking" the bunker on #11 fairway.
Once the bunker was "wacked", the final finish was put on the bunker edge.  It was at this moment when we really started to see the bullnose bunker lip developing.   Here is a video of the finish work getting done by the Ridgetop Inc. guys on #6 greenside bunker. 
Once the finish work was done. Drains were cut in and the bunker floor was cleaned out and prepared for sod.  The sod was then installed and cut our over the drains.
Throughout the sodding process we used about 3000 staples. 
Here is a short video of stapling the sod. 
About 40,000 square feet of sod was laid to complete all 6 bunkers.
After all the sod was laid, it was just time to wait and let it root down.  The weather for this whole process couldn't have been better.  We had sunny dry conditions for construction and then once the sod hit the ground, it cooled off and seemed to drizzle every other day.   Really at no time was the sod ever stressed out after that first hot day when we laid it.
So now here we are a few days ago preparing the bunker for the sand installation.  Basically we just scalped down the sod to kind of stress it.  I know all along the intent was to spray out the sod and kill it but I'll be honest, I chickened out.  I was too worried about drift of the spray killing some grass around the area, particularly the putting green.  I was told by many superintendents that they just smothered the grass with the sand and it went well so that's what we decided to do here.  After the scalping, we cleaned out the drains down to the pipe so that fresh clean sand would be in the drains once the sand was installed.
Then Kip Kalbrenner and Ridgetop Inc. came in to install the sand.  His special dump trucks moved the sand in and then the crew hand spread it to ensure proper depth was maintained throughout the process.  Here is a video of that action.
Again, it was impressive how fast the sand was installed.  Kip and his crew moved 240,000 pounds of sand that morning in about 4 hours.
The same truck you see here dumping sand is the same machine used to roll out and compact the sand once the right amount of sand was installed.   Once rolled, everyone chipped in and worked the sand by hand to get it really smooth.
So there you have it......and now we have it.  6 new bunkers that is, and they are works of art.

Friday, June 8, 2012

Moving Forward

Well we are moving forward without our friend John Harbottle and every day I find myself saying, "WOW if only John was here to see this coming together".  Here is the bunker on #11 and we've mowed the new turf twice now and it's looking really cool.  The fescue "bullnose" eyebrow is shaggy and the ryegrass surround is clipped nice and you can really see what it's going to look like.  I have yet to have anyone say they don't like it, but everyone warns that they hope the fescue eyebrow doesn't get so long that balls get lost in it.  If that happens, golf would no longer be fun here since hitting into the fescue will happen when you're only slightly off target.  No one should loose their ball just a few feet from  the center of the fairway so just know now that we will keep it maintained in such a way that you will find your ball.  You may be penalized.................but you will find your ball.  June 14th..............the sand goes in.  Can't wait to see the final product.
Again, I know John would have been pumped up out there today when he saw how the teeways were coming together.  Today we mowed them at 450/1000.  Yes they looked scalped and they are, but that is how they will look in short term.  Really it's just the ryegrass areas that are getting so scalped.  Unfortunately, there is many ryegrass areas since we have done a lot of restoration around the teeing grounds, and ryegrass sod is really our only choice for restoration projects.  If everything was straight Poa, the teeways would look amazing right now.  Here is a picture of the 9th tee complex which has not been disturbed for many years so there is little to no ryegrass.  Notice how nice this looks.  Amazing that just a few weeks ago on this teeing area, we had a square tee box and dew strip very well defined.
To speed up the transition in those ryegrass areas we are overseeeding with a mixture of Poa annua seed and Colonial Bentgrass seed.  Here you see Josh with the drop spreader overseeding the teeway on the 15th hole.
The overseeding should help but be assured that it will take several seasons of overseeding to introduce poa and several aerifications to remove ryegrass before the teeways look like our mature fairway turf.  With that said, I wouldn't worry much since I expect soon even the ryegrass areas will adapt to the new mowing height and look just fine.  Here is a close up of the scalped ryegrass.  
As you can see, there is a lot of green leaf tissue in there.  Next week we will fertilize all the teeways and once the new seed germinates, I expect they will be looking super cool.  I can't wait.  I absolutely love the look and we are already seeing a huge savings in labor since we have stopped walk mowing tees and no longer is there rough between the tees that needs mowing.  Here is a picture of the teeway on #12 today.
If you don't love this...........................I'm sorry.  With each passing day, I am more convinced that this will be a fabulous look and  the practicality of it is clear. John would absolutely love this.  Wish he was here today to see it.

Lastly, this pic also shows that the drinking fountain and "sand and seed" station have been re-installed on the 12th tee.  This kind of completes the cart path, and tree removal project that we started in October last year..................................Man does that feels good.

Sunday, June 3, 2012

Not Goodbye Yet


Yesterday we officially said goodbye to John during a beautiful service at St. Charles Borromeo followed by a reception at the Club.  For me, yesterday can be summed up in one word....."hard".  It was hard to hear Scott Alexander's eulogy.  It was hard to see the Harbottle family, and for me it was the first time I'd seen them since John's passing.  It was hard not to cry.........so I did.........often.  It was hard to say goodbye to John so you know what???................... I'm not going to.  Actually it will be quite some time before I can say goodbye to John Harbottle III.  John and I have unfinished business.  We have to complete the current Master Plan.  That will take time and throughout the process I will be trying to get in his head and carry things out the way he would have wanted.  I will be thinking about John and trying to think like John for some time.


But let me tell you yesterday was hard for me and a lot of people.  And I mean a lot of people.  It was one of those days when you realize that there are just some very special people in this world.  Like John, there are those people that just connect with others wherever they go.  It was one of those days when you say to yourself, "There is no way this many people will come to my funeral".  So in a way, it was one of those life changing moments where you look hard at yourself and ask "am I doing all right"?  And I mean that like "am I doing things right"?  You see, there was over a thousand people at John's funeral, and they weren't there because he was some great golf course architect.  Fact is...... John was a great golf course architect, but everyone came to say goodbye to John because he was a great person.  Because his job took him all over the world, he met countless individuals.  So he had the rare opportunity to connect with so many more than most of us, and it's obvious that he had the gift to connect better than any of us. So if you want to have a thousand people at your funeral, a good start would be to start being like John.  Work hard.  Love your Lord.  Love your family. Treat people the way you would like to be treated.  That's what John did and people took notice.  People respected him. Yesterday, that was so obvious.  If you were lucky enough to be there, you saw one of those life changing moments.  You wished it was yourself  that passed and not John.  You wished you could be more like John.  Mostly, you just wished John was not gone.  Many of you want to have some closure and are saying goodbye.  Many of you can.  I am not ready.  I am going to think of him, and try to think like him and finish this master plan.  In addition, I am going to try and be more like him because he was just that kind of man that a man aspires to be like......... I tell'ya I'm really going to miss him.
A memorial has started on the 6th hole.  Please feel free at any time to drive down the maintenance road and  visit it. Following are some pictures from yesterday.  First, the endless row of cars  that flowed into the Club and spilled into the practice hole.  The amount of people that packed the clubhouse I'm certain exceeded the  legal capacity.  The many displays depicting his work and his life.  It was a great tribute to him.


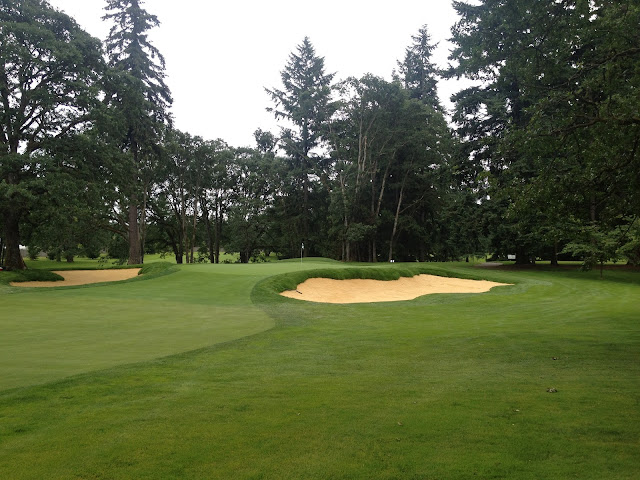
I love this picture below.  It is of  the 6th hole with John's new bunkers which actually today are not yet complete.  One of our members has the software to make them look finished by adding the sand digitally.  Don't they look beautiful.
June 14th is the day we install the sand into the new bunkers and I'm sure John will be proud of them since I know he'll be watching and making sure I have the right depth from edge to center.  Soon we will see the finished product that is John's vision.  There is no doubt we will love it. 
 Below is the front and back of the funeral service bulletin.